Before starting please note that most computers will take over 32 hours to encode a 1080p movie with the recommended profile here (although you can also do a much faster profile which I will briefly cover). I do not recommend encoding on any laptop/netbook or desktop with lower specs then an Intel 2.4 Ghz Core 2 Duo. On lesser computers you may not be able to multitask or even move your mouse until encoding is complete. It took about 18 hours to encode the movie in this guide at an average of 9.74 FPS on the first pass and 2.78 FPS for the second pass on a Intel Core i7 @ 2.66 Ghz with 12GB of RAM and the HDDs in Raid0. Whatever computer you use, ensure that it has adequate cooling.
You will need:
- A Computer with Windows XP, Windows Vista, or Windows 7 (Windows XP users must have .NET Framework 2.0 installed to use MeGUI, untested in Windows 7 and will remain so until RTM)
- AnyDVD HD, version 6.5.4.0 or above although current version is always recommended to remove the latest BD+ protection
- AviSynth 2.5, (I used version 2.5.8, install first)
- MeGUI latest stable, (install second)
- MKVToolnix for Windows, (install third)
- ffdshow, media decoder and encoder (may not be required in Windows 7, I used the “tryout” December 22, 2008 build)
- Haali Media Splitter
- eac3to 3.16 (extract to the root of C: or another location you will remember)
- Plugins for AviSynth, Mirror 1, Mirror 2, Mirror 3 (extract to Program Files > AviSynth 2.5 > plugins)
- SurCode DVD DTS, DTS audio encoder (not required if the source audio is AC3)
- Blu-ray compatible drive(if you have your own BluRay disc)
- Blu-ray Movie
Setup:
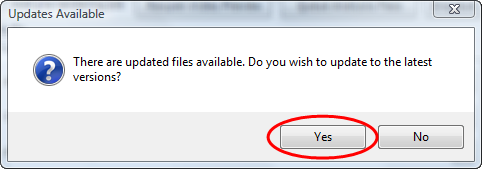
Open MeGUI and update everything (an update screen should open on it’s own), when asked to import presets select and import everything. Close MeGUI. It may be a good idea to restart your computer at this time.
Put the Blu-ray disk in your drive.
Step 1:
Rip BD to Harddisk with AnyDVD (ending with step 3).
Step 2:
Open MeGUI.
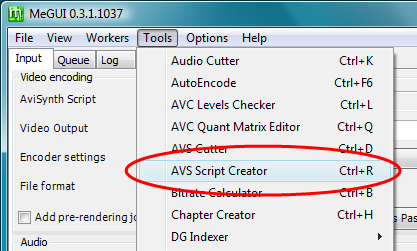
Go to Menu Bar > Tools > AVS Script Creator.
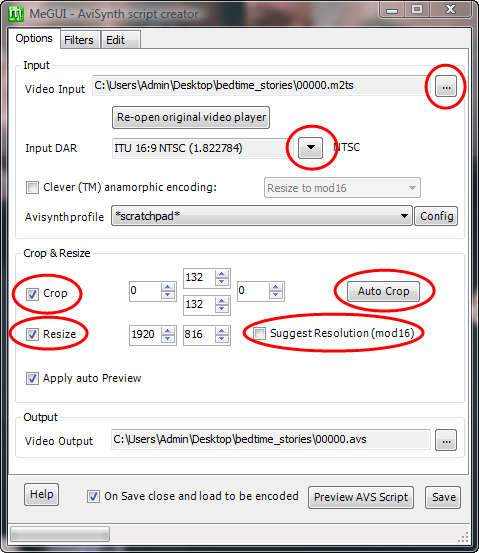
Input the main movie, found within BDMV > STREAM (normally the largest *.m2ts). A preview window should open — leave it open.
Step 3:
Leaving the preview window open, pull up the “AviSynth script creator” window again. More options should be visible.
Tick “Crop” and then click “Auto Crop” (you may need to manually crop).
Next tick “Resize”, if you know what the true resolution is type it in, if not tick “Suggest Resolution (mod16)” then untick “Suggested Resolution (mod16)”.
Set Input DAR to ITU 16:9 NTSC.
If you want to do a 1080p (source) encode skip to step 4 (which I will be doing), if you want to reduce the resolution to 720p continue with this step.
My movie is 1920 x 816 (see the resize field), so I will use a table to figure out what resolution I must use for a 720p encode.
1080p Resolutions:
AR Resolution
1.333:1 = 1400 x 1080
1.666:1 = 1800 x 1080
1.777:1 = 1920×1080
1.839:1 = 1920 x 1044
1.846:1 = 1920 x 1040
1.853:1 = 1920 x 1036
2.341:1 = 192o x 820
2.352:1 = 1920 x 816 <– this is my source resolution
2.364:1 = 1920 x 812
2.376:1 = 1920 x 808
2.388:1 = 1920 x 804
2.400:1 = 1920 x 800
2.412:1 = 1920 x 796
720p Resolutions:
AR Resolution
1.333:1 = 960 x 720
1.666:1 = 1200 x 720
1.777:1 = 1280 x 720
1.839:1 = 1280 x 696
1.849:1 = 1280 x 692
1.860:1 = 1280 x 688
2.335:1 = 1280 x 548
2.352:1 = 1280 x 544 <– this is what my 720p resolution will be
2.370:1 = 1280 x 540
2.388:1 = 1280 x 536
2.406:1 = 1280 x 532
2.424:1 = 1280 x 528
Once you figure out your new resolution, type it in the resize fields.
Step 4:
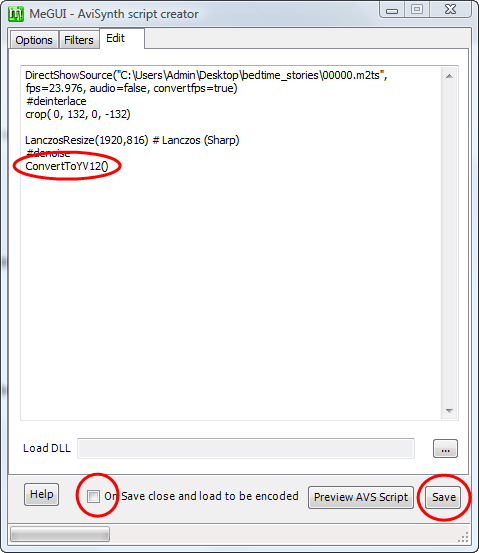
Go to the last tab, titled “Edit”, this is where you can add filters such as ‘sharpen’. Generally with 1080p encodes you will leave the encode as close to the source as possible.
At the bottom of the textbox write:
ConvertToYV12()
While it is very detailed and complex what this actually does, in short it can improve your encode and make everything a little smoother.
If you first would like to do a sample encode enter the following code at the bottom of the text box:
trim(xxxx,yyyy) # xxxx is the starting frame and yyyy is the ending frame so for 500 frames you will type trim(4736,5236)
Uncheck “On Save close and load to be encoded”, and then save.
If the MeGUI Script Creator and preview windows do not close, you can do so.
Step 5:
Now we get to work with the audio.
To check what audio streams you have to work with, open Command Prompt (Start > All Programs > Accessories).
You must change CMD to use the directory eac3to is in. I extracted eac3to to my C drive so I must type “cd c:eac3to316″ (316 is the build number).
I placed Bedtime Stories on my desktop in a folder called “bedtime_stories” so I must type “eac3to c:usersadmindesktopbedtime_stories0000.m2ts” (please note that this will not work if you have a space in any of the folders or file names).
After processing the streams, eac3to will list them (explained below).
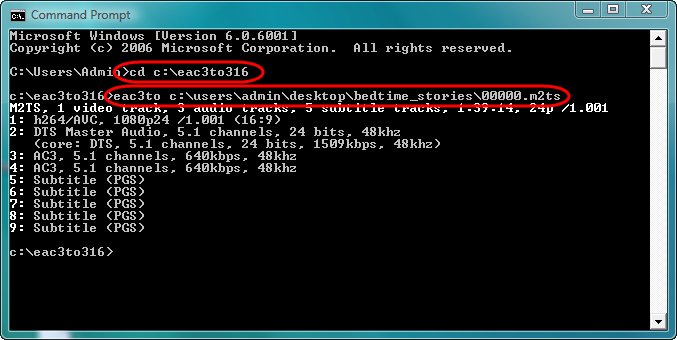
1) H.264/AVC this is the video, you can also see that it is 1080 pixels in hight, runs at an average of 24 FPS, and has an aspect ratio of 16:9.
2) DTS Master Audio this is an audio stream, you can see that it has 5.1 channels (used for a 5.1 surround sound system), and has a bitrate of 1509. This is the one we are looking for it can be called many different things, take note whether it is an AC3 stream or not.
3 & 4) AC3 this is another audio stream, Bedtime Stories was released with both French and Spanish languages as extras so this is one of those, bitrate of 640.
5 – 9) These are all subtitles, I’m not entirely sure what they all are although the movie includes English, French and Spanish subs.
Remember the track position of the desired audio stream.
This guide will now split for extracting the audio,
For AC3:
Use the following command:
eac3to “<drive>:<folders><file name>.m2ts” <track>: “<drive>:<folders>audio_track<track number>.ac3″
So if I wanted the spoken language for my movie to be French I would write:
eac3to “c:usersadmindesktopbedtime_stories0000.m2ts” 3: “c:usersadmindesktopbedtime_storiesaudio_track3.ac3″
Wait for eac3to to extract your audio (continue with step 6).
For DTS or True-HD:
If the audio is a form of DTS (such as this one) or True-HD you must have SurCode installed before continuing.
Use the following code:
eac3to “<drive>:<folders><file name>.m2ts” <track>: “<drive>:<folders>audio_track<track number>.dts” -1536
I will be using:
eac3to “c:usersadmindesktopbedtime_stories0000.m2ts” 2: “c:usersadmindesktopbedtime_storiesaudio_track2.dts” -1536
Wait for eac3to and SurCode to decode the audio to *.wavs, then encode to a *.dts.
Step 6:
Now that we know what format of audio we have we can calculate the bitrate.
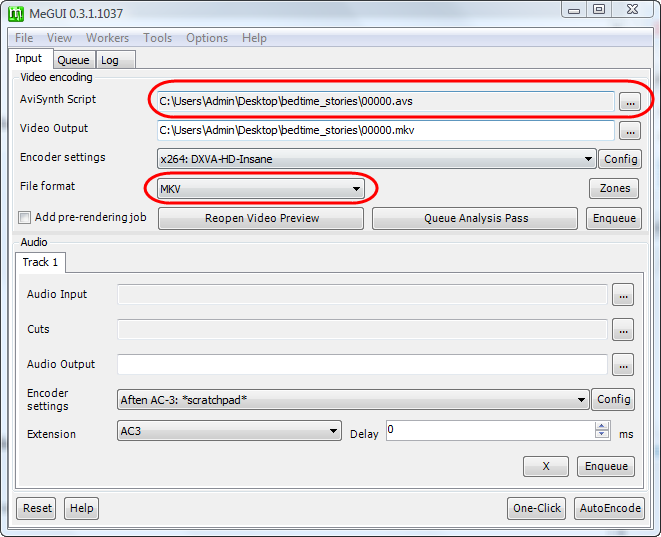
Import the AviSynth Script that we just created (under video not audio), a preview window should open — you can close it.
Set the file format to MKV.
To set the bitrate we must go to Menu > Tools > Bitrate Calculator.
For audio type select the format you will be using (AC3 or DTS), for AC3 set the bitrate to 640 and for DTS set it to 1536.
Now you will have to decide on a bitrate. While every movie is different, I normally choose a bitrate anywhere from 9,000 to 14,000 kilobits/second for 1080p and about half that for 720p based on test encodes. This is definitely an art! For Bedtime Stories I found 12,100 kb/s to be good. If this is your first encode I would recommend using a preset of 1 DVD-9.
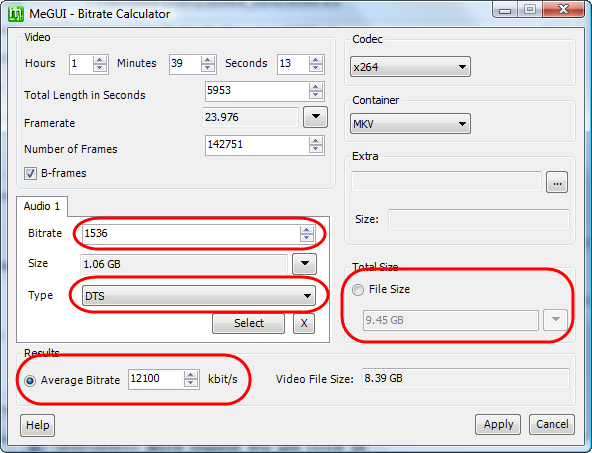
Click “Apply” (if asked to copy bitrate to video settings hit Yes).
Step 7:
For encoder settings we will create a custom profile, although use “x264: DXVA-HD-Fast” if your computer is slow or you don’t care much about quality and want to shorten the time to encode by about 3x (then skip to step
 .
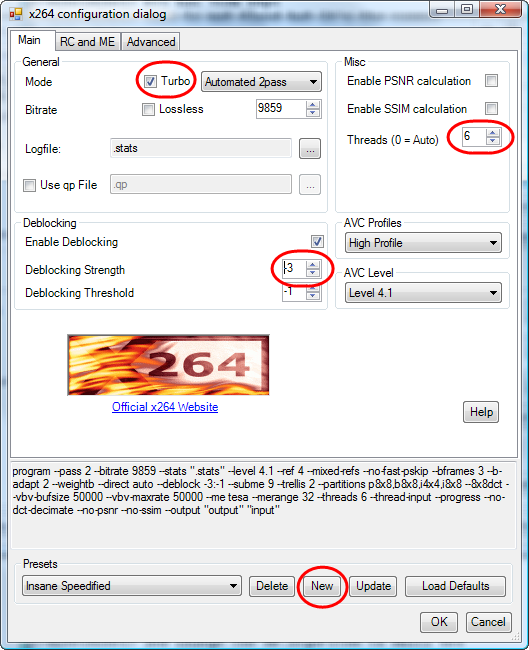
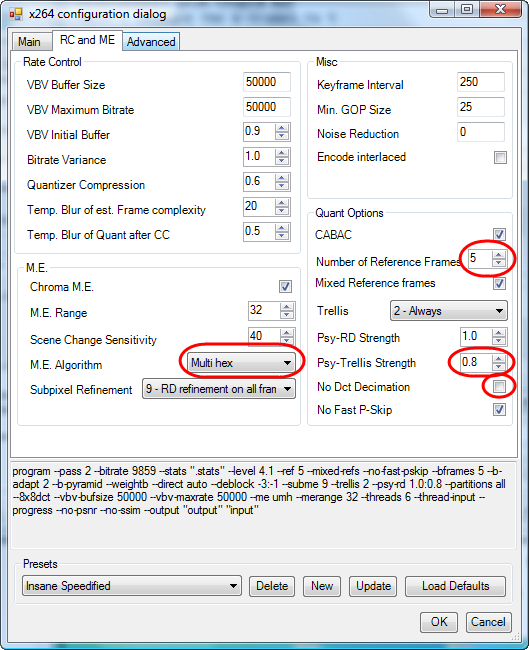
.Set profile to “x264: DXVA-HD-Insane” and click “Config” to change some settings which will speed things up.
Click on the “New” button call this custom profile what you want, I’m going to call mine “Insane Speedified”
Check Turbo, increase Threads to 6, and change the Deblocking Streagth to -3.
Go to the next tab (titled “RC and ME”), increase Number of Reference Frames to 5, uncheck “No Dct Deimation”, change M.E. Algorithm to “Multi hex”, and increase Psy-Trellis Strength to .8.
Next tap (“Advanced”), increase number of B-frames to 5, check B-pyramid, choose “All” for Macroblock Options.

Click “OK”!
You will be asked if you want to update the selected profile click “Yes”.
Step 8:
Now to encode the movie!
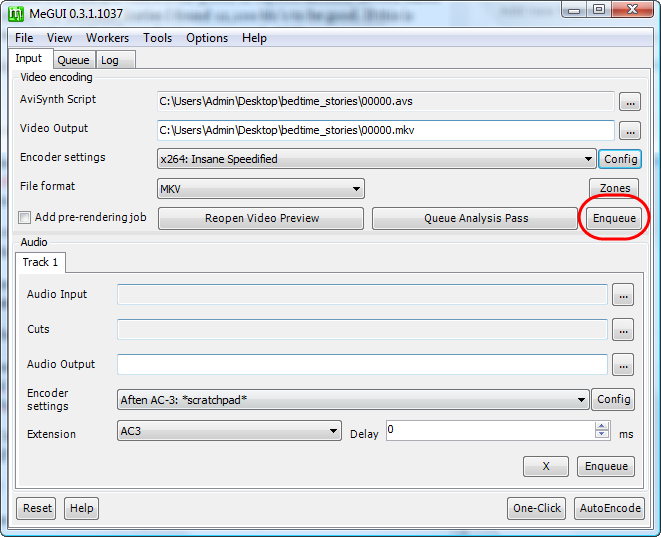
Hit Enqueue (the one in the video encoding box), this will queue your movie.
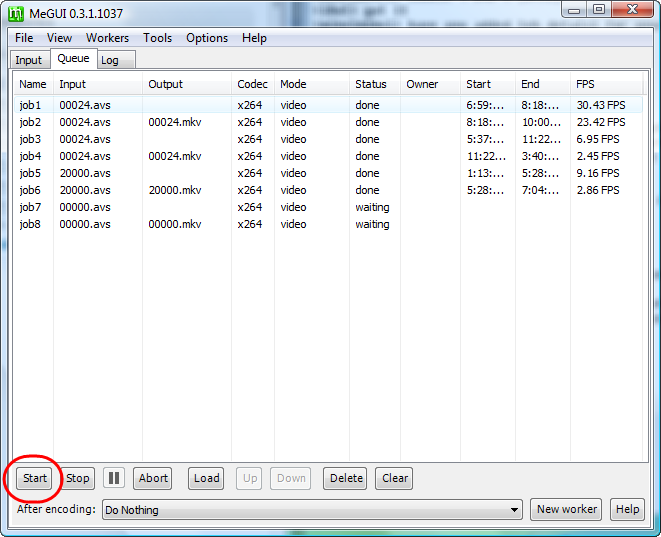
Go to the next tap called Queue, and hit Start.
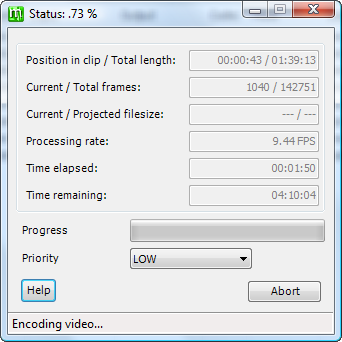
A new dialog box will open reporting the current speed at which you are encoding along with other helpful info.
Step 9:
At this point you should have an AC3 or DTS audio stream, and an MKV with no audio. We now need to MUX them together into a single MKV.
Open “mkvmerge GUI” (installed with MKVToolnix) and the folder your files for encoding are in.
Drag both streams to the input box in mkvmerge.
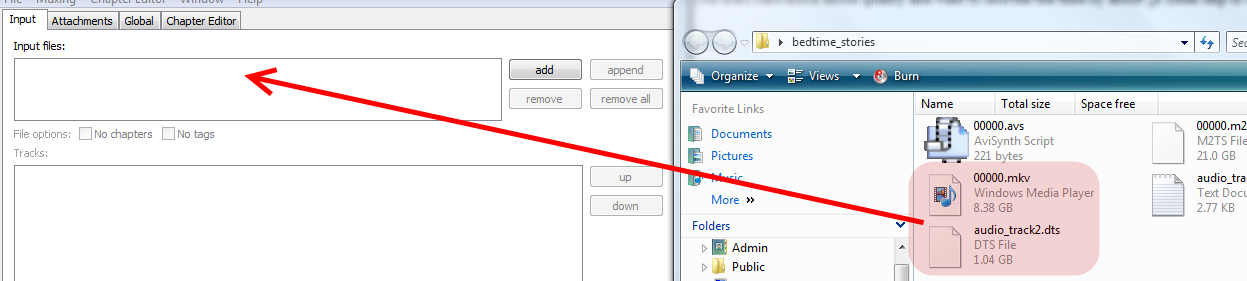
Change the file name of the output so it will not overwrite the source.

Hit “Start muxing” and wait a few minutes… Yay! You completed your first encode, you should now be able to play the movie in your favorite media player!
0 comments:
Post a Comment