if not and the window 'what would you like to play this cd with' pops up, click windows media player.
OR
Open Windows Media Player & insert your music cd, when it starts to play click the stop.
On the top tool bar, click 'rip' this takes you to the ripping screen where the tracks are listed.
On this screen the 'rip' button will have a small white arrow, below or by its side, depending on version.
click this, [the arrow will also appear by placing the cursor over the button]

Insert the cd, windows media player will start automatically if it is your default player,
if not and the window 'what would you like to play this cd with' pops up, click windows media player.
OR
Open Windows Media Player & insert your music cd, when it starts to play click the stop.
On the top tool bar, click 'rip' this takes you to the ripping screen where the tracks are listed.
On this screen the 'rip' button will have a small white arrow, below or by its side, depending on version.
click this, [the arrow will also appear by placing the cursor over the button]
Select 'format' from the drop down list, click the desired format, 'mp3' is the most commonly used here.
bring the list back and select 'bitrate' click '320kbps (best quality)'
Bring the drop down list back one more time, click 'more options...'
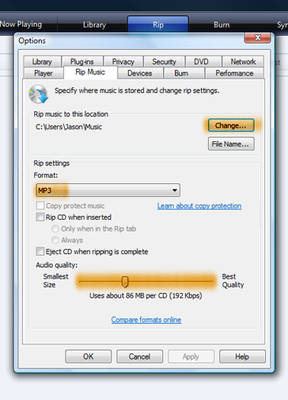
check 'rip settings' these should now read, format mp3 & audio quality, set at best quality [320kbps]
tick the boxes if you desire any of the noted actions to take place,
on the top section 'rip music to this location' click on 'change' button to select the folder where you would like
it saved to. check all is correct, then click 'apply' and close the window.
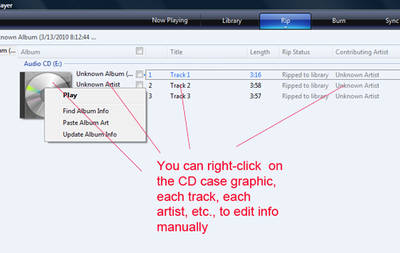
back on the rip screen, if the cd you inserted has no track list,
Right click on the cd icon, click 'find album info' this will list albums, if your one is there highlight it and click 'next'
This will bring up a verification screen, click finish to update the album info.
If it is unable to locate the info you can add it manually, track at a time by right clicking each one, you can also edit the 'album' artist'
'genre' 'year' listed by the side of the cd icon by right clicking each one to edit.
Insert the cd, windows media player will start automatically if it is your default player,
if not and the window 'what would you like to play this cd with' pops up, click windows media player.
OR
Open Windows Media Player & insert your music cd, when it starts to play click the stop.
On the top tool bar, click 'rip' this takes you to the ripping screen where the tracks are listed.
On this screen the 'rip' button will have a small white arrow, below or by its side, depending on version.
click this, [the arrow will also appear by placing the cursor over the button]
Select 'format' from the drop down list, click the desired format, 'mp3' is the most commonly used here.
bring the list back and select 'bitrate' click '320kbps (best quality)'
Bring the drop down list back one more time, click 'more options...'
check 'rip settings' these should now read, format mp3 & audio quality, set at best quality [320kbps]
tick the boxes if you desire any of the noted actions to take place,
on the top section 'rip music to this location' click on 'change' button to select the folder where you would like
it saved to. check all is correct, then click 'apply' and close the window.
back on the rip screen, if the cd you inserted has no track list,
Right click on the cd icon, click 'find album info' this will list albums, if your one is there highlight it and click 'next'
This will bring up a verification screen, click finish to update the album info.
If it is unable to locate the info you can add it manually, track at a time by right clicking each one, you can also edit the 'album' artist'
'genre' 'year' listed by the side of the cd icon by right clicking each one to edit.
make sure all the tracks you want ripped have a tick in the box, unchecked box will not be ripped...
When you are happy with all the settings, click the 'start rip' at the bottom left corner,
Go make yourself a coffee, by the time you get back the album would have been ripped to the WMP library
and to your specified folder where you can access it and play to check for any errors,
If all is good, time to make that torrent Grin
Each time you rip a disc after this, the settings should remain the same, but always have a quick check
on the 'format' and 'bitrate' that they are on mp3 @ 320kbps, before ripping, this can save you time
just in case they have been changed, which can happen now and again....
Advise
When turning music ripped on WMP into a torrent always check the files contained,
and edit out any unwanted ones, WMP does have a habit of placing hidden 'ini' files
and the like in the folders, they are harmless but annoying for the downloader...
0 comments:
Post a Comment